Roberto Rossi
Ice climbing belays / How to construct belays on ice as safely as possible.

 Copia link

 1 / 12Roberto Rossi
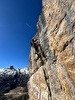
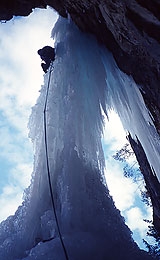
During winter months many climbers turn their attention to ice climbing. Words such as verglas, cauliflower and brittle ice immediately spring to mind, but while this jargon is quickly learnt, true understanding of these different types of ice comes about only after much time climbing outdoors, acquiring knowledge.
Experience counts for a great deal and is of vital importance, since the vast majority of ice climbs are “traditional” are need to be equipped with runners and belays. These climbs are distinctly more demanding than pure rock climbs at a crag equipped with bolts and abseil chains.
This short article analyses how to correctly construct belays on ice.
Where to position the belay
Locating the correct place to position the belay is fundamental for the climbers’ safety. The following factors need to be considered:
1- the quality of the ice, so as to guarantee maximum anchor strength
2- the position of the belay, bearing in mind objective dangers (falling rocks or ice) and the line of ascent.
A good belay stance should be on compact ice, at the edge of the icefall and off centre compared to the following pitch so as to avoid falling ice from the lead climber.
Types of belay stance
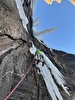
A – Semi-mobile ice screw belay
B – Threaded belay (Abalakoff or Abalakov)
A SEMI-MOBILE ICE SCREW BELAY
Given its functionality, safety and speed of construction, the semi-mobile ice screw belay is definitely the reference belay for ice climbs.
1- The ice screws should be positioned almost vertically one above the other, and no closer than 30cm, so as to create an acute angle. Place screw gate carabiners into the ice screw eyelets and connect these with a sling, which must have two overhand knots tied close to the V-point of the belay.
2- Twist the upper section of the sling and place a screwgate carabiner into this loop. Use this carabiner for your belay.
An acute angled belay distributes the weight ideally onto both anchors, as shown in the drawing above.
3, 4 - Photos 3-4-5 show how the weight is distributed with wider angles.
5- Belays with angles wider than 90 degrees are definitely not recommended.
Gear required:
2 ice screws
3 screwgate carabiner
1 sling
Suggestions:
- To optimise the amount of gear necessary and to speed up the time needed to construct the belay prepare two slings with overhand knots and screwgate carabiners.
- Clip carabiners directly into the ice screw and slings. Do not use extenders.
- The two overhand knots stop the belay from shock loading unnecessarily should one of the two ice screw pull out.
B THREADED BELAY aka ABALAKOFF THREAD, or ABALAKOV THREAD
The Abalakoff (or Abalakov) thread is an extremely useful anchor for ice climbing stances and is often used for abseils.
1 - Locate a section of compact ice and, with an ice screw, drill a hole horizontally and at roughly 45 degrees compared to the surface of the ice (sideways). Now drill a second hole that joins the first at its deepest point.
2 - Remove the ice screw, thread a belay rope (min. 8 mm) into one end and place the Abalakoff hooker into the other to extract the rope. Tie the two ends together to form an anchor ready for the belay or abseil.
3 - The distance between the two holes should be roughly as long as the ice screws (about 20cm). Compact ice holds about 12 Kn, but this rapidly diminishes if the distance between the ice screws is reduced.
Gear required:
2 ice screws
1 8mm abseil rope
1 Abalakoff hooker
Suggestions:
- If the ice quality is deemed not perfect, construct two Abalakoff belays not far from each other and thread the abseil rope into both.
- The Abalakoff thread can also be used as a belay stance but must be used in conjunction with a 9mm rope and connected to a single ice screw using a sling tied off with two overhand knots, as described previously.
Notes: The information published here is not complete. Please refer to the Mountain Guides' technical manual.


 - Ice climbing belays - Threaded belay (Abalakoff Thread): 1. Locate a section of compact ice and, with an ice screw, drill a hole horizontally and at roughly 45 degrees compared to the surface of the ice (sideways). Now drill a second hole that joins the first at its deepest point")
 See all photos